Explore the simple steps to replace a garage door seal that will keep your space dust and water-free, while maintaining energy efficiency.
Replacing a garage door seal is a straightforward DIY task that can prevent drafts, water, and unwanted critters from entering your garage. This article will guide you through the process step by step, from choosing the right type of seal for your garage door to the actual installation process.
Whether you’re dealing with a roll-up, swing-up, or slide-to-side door, you’ll find the precise instructions here.
So, let’s dive into the details and ensure your garage door is properly sealed and protected.
Key takeaways:
- Choose the right tools for garage door seal replacement.
- Gather materials like the right seal, adhesive, and safety gear.
- Measure the garage door accurately before purchasing a new seal.
- Remove the old seal with caution and dispose of it properly.
- Clean the garage door track thoroughly before installing the new seal.
Identify the Necessary Tools for Garage Door Seal Replacement

Commencing the task of seal replacement requires a set of dedicated tools. First up, you’ll need a wrench or socket set to dismantle the existing seal. Secondly, a pair of pliers can be handy to remove any stubborn fixtures. Next, a good utility knife will be useful in trimming the new seal. Finally, a tape measure is vital to ensure the new seal corresponds precisely to the width of your garage door. Please remember, using suitable tools not only enhances your safety but also make the replacement process smoother and less time-consuming.
List of Materials Required for the Project

To kick start this project, gather the necessary materials which include a replacement garage door seal that matches your door’s width, measure tape, mark pen, a utility knife, weather resistant adhesive (especially if you have a wooden door), gloves, and safety glasses.
For a seamless procedure, choose a seal made of durable material like rubber or vinyl, which will stand strong against harsh weather conditions.
Remember, every garage door is unique, and therefore, the type and size of your door will significantly influence your choice of door bottom seal.
As a helpful tip, carry a small part of the old seal to the store to help identify a matching type and possibly alleviate any hitches in the installation process.
Ensure you are equipped with a flat-blade screwdriver for prying out the old seal, a pair of pliers for removing any remaining seal fragments, and a wire brush to scrape off any rust on the track.
Having these materials on hand before beginning the task will make the process smoother and decrease the total time spent on the project.
Avoid shortcuts as meticulous preparations guarantee success in any garage maintenance assignment.
Measuring the Garage Door for the New Seal

Before purchasing and installing a new seal, accurate measurements of the garage door are crucial. Kick off the process with a tape measure, calculating the width of the door from edge to edge. If discrepancies surface within the dimensions, always err on the side of caution and round up to the nearest inch.
Next, determine the thickness of the door. Lightly press the end of the tape measure against the door’s bottom to get this measurement. Remember, thunderstorms and severe weather conditions can cause metal garage doors to expand. Hence, consider accounting for an allowance for this possibility.
Finally, gauge the width of the seal track if your garage door has one. This information will influence the type of seal you purchase, as certain seals are specifically designed to fit particular track sizes. Armed with these measurements, your journey towards a snug and weather-resistant garage door is made significantly easier.
Procedure for Removing the Old Garage Door Bottom Seal
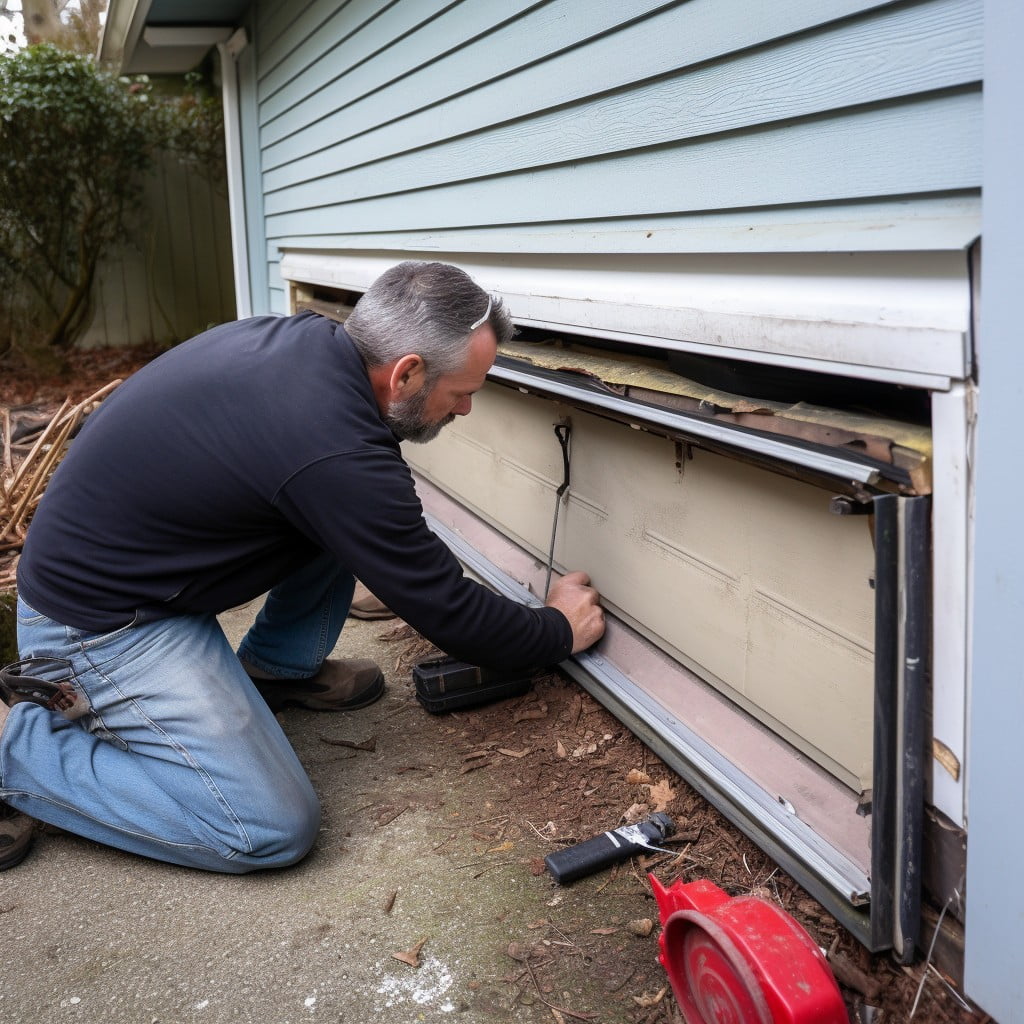
First, raise the garage door fully to ensure unhindered access to the lowermost part.
Next, remove any securing nails or screws holding the old seal in place.
Use caution with aged materials as they can be brittle.
If the seal is secured with adhesive, you may need a scraper or chisel to dislodge it effectively.
Always exercise care while using sharp tools and avoid damaging the garage door in the process.
Once loosened, grasp one end of the seal and gently pull it off the garage door.
It should come away in one piece, but if it breaks, repeat the process until the entirety of the seal is removed.
For seals installed into a track, slide the old seal out one end.
Always remember to follow safety precautions during the removal process and dispose of the old seal responsibly.
Cleaning the Garage Door Track
Once you’ve removed the old seal, dust and grit may have gathered in the track over time. Start by using a sturdy brush to dislodge anything that’s collected in the grooves. Pay particular attention to the corners as these areas often harbor the most debris.
Next, apply a specialized track cleaner, commonly available at auto parts stores, to tackle any built-up grease or grime for in-depth cleaning. Follow the manufacturer’s instructions for the best result but generally, spray the cleaner liberally along the entire track, then wait a few minutes to let it do its magic.
Then, use a rag to wipe the entire track clean. It may be beneficial to repeat this step a couple of times to ensure all grime and old grease has been removed.
Finally, do not forget to check the track for damage or dents from the previous seal. If there are any discrepancies, you may need to either tap them out using a rubber mallet or consider replacing the track. Applying a lubricant designed for garage doors can also help make the track smooth and ready for the new seal.
Remember, the cleaner and smoother your track, the better your new door seal will perform.
Steps for Installing the Garage Door Bottom Seal
Begin by sliding the new seal into the track. Start from one end of the door and slowly push it along the track. This process might seem straightforward but can be physically demanding, given the door’s length. It may require some force, especially at the bends in the track. Remember to be patient; avoid rushing this step to protect the seal from damage.
Next, ensure that the seal extends across the entire door length, with a little extra on each end. You might need to cut down the excess depending on your door’s size. To do this, mark the desired length on the seal. Then, using a sharp utility knife, carefully cut the seal across the width, ensuring a straight cut for a clean appearance.
Finally, secure the seal to the track using screws or garage door adhesive if required. Not every seal will need this, but some door types provide additional channels or screw holes for this purpose. Compatibility varies by door design and seal type. Always refer to manufacturer’s instructions for the best results. Applying this step correctly will ensure that the seal fits snugly, providing an effective barrier against weather elements and pests.
Techniques to Fasten a New Bottom Seal to a Wood Garage Door
Start by aligning the seal at the center of your garage door, as it enables a balanced distribution across its length. Firmly press the seal into the bottom of the door until it stays put. Be patient with this process as it may take some effort.
Once you’re satisfied with the position of the seal, use galvanized roofing nails to secure it to the door. Drive these nails every three to four inches along the track length, ensuring they penetrate both the seal and the wood. This will fortify the seal’s hold and prevent it from coming loose over time.
For enhanced weatherproofing, apply a thin layer of weatherstrip adhesive onto the bottom of the wood door before fastening the seal. This glue further strengthens the bond between the seal and the wood, providing an extra safeguard against the elements.
Remember to cut off any additional length once you’ve fastened the entire seal. Use a utility knife for this, ensuring your seal perfectly matches the door length.
Take care when performing these tasks, as any errors may lead to poor door function, exposing your garage to weather elements or pests. Properly fastening a bottom seal preserves the state of your garage, improving its longevity and functionality.
Approach to Fixing a Gap At the Bottom of the Garage Door
First, determine the extent of the gap. A bigger gap might require adding an extra strip of seal or weatherstripping, while smaller gaps can often be remedied by adjusting the garage door’s limiting screw. This screw tells the door how far to close. If it’s not properly adjusted, the garage door may stop before it fully closes, causing a gap.
For screw adjustment, you usually find these screws on the garage door motor housing. Turning them counterclockwise will allow the door to close more. However, be cautious not to let the garage door close too tightly, as it might apply too much pressure on the motor.
If the floor is uneven causing the gap, using a threshold seal can make a significant difference. This robust rubber strip is glued to the floor where the door closes, providing a level surface for the door seal to rest on.
Always remember that if the gap is a result of warping or damages to the door itself, it may be time for a professional to intervene or to consider a door replacement. It’s crucial to tackle this issue promptly to prevent weather elements and pests from entering your garage.
How to Clean Up a Rusty Garage Door Track
An effective way to tackle rust on your garage door track is by using a mixture of vinegar and baking soda, known for their rust-dissolving properties. Here’s how you can utilize them:
1. Mix equal parts of vinegar and baking soda in a container until you get a paste-like consistency.
2. Apply the mixture on the rusted areas of the garage door track.
3. Wait for at least 10 minutes to allow the solution to penetrate the rust.
4. Use a stiff-bristled brush to scrub off the rust. For stubborn rust spots, consider using a wire brush.
5. Once done, use a damp rag to remove any remaining mixture.
6. Dry the tracks completely to prevent formation of new rust.
7. Lastly, apply a thin coat of lubricant to help reduce future rust and ensure smooth operation of the door.
Remember, the rustier the track, the more time the process requires. This process is inexpensive, natural, and effective in restoring the condition of your garage door track. Safety glasses and gloves are recommended.
FAQ
How much does it cost to replace the rubber seal on a garage door?
The cost to replace the rubber seal on a garage door ranges from $85 to $250, considering the price of the seal itself and the installation fees.
What are the materials required to replace the rubber seal on a garage door?
To replace the rubber seal on a garage door, you will need a new rubber seal, safety gloves, a pry bar, a utility knife, and a rubber mallet.
How long does it take to replace the seal on a garage door?
Replacing the seal on a garage door typically takes anywhere from 30 minutes to an hour, depending on the size and condition of the garage door.
Are there common mistakes to avoid when replacing a garage door seal?
Yes, common mistakes while replacing a garage door seal include not measuring the door properly, choosing the wrong type of seal, and neglecting to clean the area before installation.